
Loading media in Cinelerra
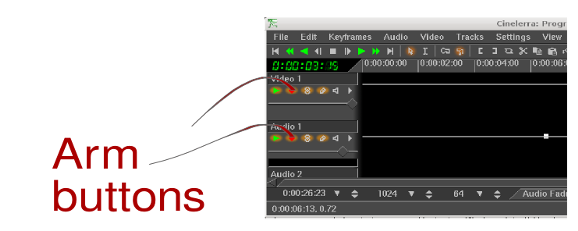
How to arm and disarm tracks
Normally all tracks are affected by editing operations. They are armed.
In some cases you may want to prevent them by being affected. You need to disarm them.
Other programs refers to this function with the terms locking/unlocking tracks.
In Cinelerra all tracks are armed by default. To disarm/arm it again click on the red arm button in the patchbay of the desired track.
Shift-clicking on a track arm button switches between a single track armed mode and an all tracks armed mode.
Press the Tab key or the Shift+Tab keys while the mouse pointer is over the track to have the same results by using keyboard shortcuts.
Note: some operations can affect multiple tracks (e.g. copy & paste) some can affect only one track (e.g. compositor camera). In this last case, the track affected is the first track armed of the stack (from top) even if it’s empty. It is not necessarily the one shown in the compositor output (it can be empty or faded).
How to add and remove tracks
By default Cinelerra comes with one video track and two audio tracks but you can add or remove tracks at will.
To add a video track go to Video→Add track. To add an audio track go to Audio→Add track.
Keyboard shortcuts for those operations are SHIFT-T for video and t for audio tracks.
To delete a track right click on the picon and select Delete track from the popup menu.
The d key will delete the last track of the stack.
Note: the d key is dangerously close to the s key you use for saving. If you become aware of that too late, the Undo funcion might come to the rescue.
How to load video, audio and still images from disk to the Resources Window
Go to File → Load files… to open the Load dialog window and select the files to load.
The icons on the top right will help you to go up a directory, refresh the files listed, delete files, display files as text or icons. If you pose the mouse pointer over an icon, a tooltip will pop up as a reminder.
The first text box contains the absolute path to the media directory. The arrow on the left will open a drop down list of directories recently used.
The main field display the content of the directory. Files can be displayed as icons or as text. Text display is more informative: it tells you also size and date of files.
The third text box shows the filename of the file you highlighted for loading by clicking on the main field.
You can also highlight multiple continguous files. In display text mode click on the first file and SHIFT-click on the last one. In display icons mode click on the background and drag over the desired icons. In this case the third text box will show the filename of the first file of the highlighted list.
The forth text box is a filter to let you decide what file format to be shown on the main field. The default filter (simbolized as an asterisk * ) will show all the file formats. Click on the arrow on the right to open a drop down menu with the list of the available file format filters.
The last text box lets you define the way your file will be loaded in your project. The drop down menu list all the available insertion strategies. Select Creat new resources only to load your media onto the Media Tab of the Resources Window.
Clicking on the tick green symbol will start the load operation.
How to load assets on the timeline
Method 1: Drag and drop from the Resources window
Make sure you have the right number of tracks armed in the timeline. MiniDV videos need one video track and two audio tracks armed (stereo sound has a left channel and a right channel).
By default the timeline has one video track and two audio tracks armed. To add or remove tracks see HOWTO add and remove tracks
Drag the desired asset from the Media Tab of the Resources Window and drop it directly on the timeline. In the Resources window your asset can be represented by a picon or by text, depending on the display method you have chosen with the popup menu of the Resources Window.
Videos and images must be dropped on armed video tracks, audio files on armed audio tracks.
When dragging your media, the mouse pointer will drag the thumbnail and, once over the timeline, the outline of a white rectangle, as big as the edit you are going to have.
Drag the media to the desired position of an empty track of the timeline and drop it. If there are other edits on that track, when you move the white outline over an edit, you will see a bow tie symbol >< appearing at edit boundaries. If you drop the media there, the new edit will start from the edit boundary indicated by the center of the bow tie ><.
If your asset is a still image, you can set the duration it is going to have on the timeline in Settings → Preferences → Recording - Images. Check the option Import images with a duration of … seconds and enter the desired length.
Method 2: Paste from the Resources window
-
Make sure you have the right number of tracks armed in the timeline. MiniDV videos need one video track and two audio tracks armed (stereo sound has a left channel and a right channel).
By default the timeline has one video track and two audio tracks armed. To add or remove tracks see HOWTO add and remove tracks -
Set the insertion point in the position in time where you want the asset loaded.
-
Rigth click on the file in the Media tab of the Resources window and select Paste from the pop-up menu. The entire asset will be loaded on the timeline at insertion point.
Method 3: From the viewer
-
Load the clip on the viewer.
-
In the viewer, select the portion of the asset you want to import with [ and ].
-
Make sure there are no in/out points set on the timeline.
-
Set the insertion point at the desired position on the timeline.
-
Splice or overwrite from the viewer by clicking on the relative buttons.
Note for non native English speakers: Do not confuse Splice and Split. See the glossary.
Method 4: From the load dialog
You can load assets directly from the Load dialog window.
Follow the procedure as for loading media from disk to the Resources window and pay attention to the Insertion strategy. Choose the appropriate one. See How to choose the Insertion strategy
How to choose the right Insertion Strategy
The option Insertion strategy (at the bottom on the Load dialog) lets you decide on the destiny of your loaded media.
Here is the basic description of the most common ones:
- Create new resources only
-
The file is loaded on the Media tab of the Resources window.
- Concatenate to existing tracks
-
The file is loaded on the Timeline and appended to the existing set of armed tracks.
- Paste at insertion point
-
The file is pasted into the timeline at the position of the insertion point, on the first set of armed tracks.
-
If multiple files are selected, they are loaded one after another in alphanumeric order.
-
If no tracks are armed, no files will be loaded on the Timeline.
-
New resources are always created in the Resources window, independently of the insertion strategy.
See the manual to know more.
How to change the display mode of the Resources window
Assets are listed in the Media tab of the Resources window. By default they are displayed as icons with filenames. Video assets are displayed as picons.
It is possible to display assets as filenames only. To change the display mode, right click on the asset and select Display text or Display icons in the popup menu.
It is possible to switch display mode in every tab of the Resources window (tabs list box included).
How to load a clip onto the Viewer window
Assets are listed in the Media tab of the Resources window. They can be displayed as icons or text, depending on the display mode.
You can load a clip from the Resources window to the Viewer window in many ways:
-
Double click on the asset in the Media tab.
-
Drag the clip from the Media tab to the Viewer window. Drop it when the Viewer window is highlighted (with white borders).
-
Right click on the asset in the Media tab and select View from the options listed in the popup menu.
You can’t load multiple files onto the Viewer.
How to load still images on the timeline
In Cinelerra you can load images in many formats: JPEG, PNG, TIF, TGA format and more. (for other formats see the Manual).
You can load image as you would do with any other media file but you’ll have a nasty surprise: by default on the timeline an image is one frame long. The picon on the timeline is so thin that is hardly visible.
Don’t panic!! You can make the image longer that one frame. Here are two different methods of achieving that:
Load the image on the timeline. Zoom in in time (using the arrow down) to see the picon more clearly. Drag its right boundary keeping the mouse pointer inside the picon.
Go to Settings → Preferences → Recording - Images. Check the option Import images with a duration of … seconds and enter the desired length. This will affect the image duration during the load onto the timeline both from the Load dialog or from the Resources window.
You can load multiple images on the timeline, e.g. when you want to create a slideshow.
How to load images and music for a slideshow
The best workflow for creating a basic slide show is:
-
Set the duration of images as described in the above howto.
-
Load multiple images using Concatenate to existing tracks as insertion strategy. You’ll get all your images on the timeline at once, one after another.
-
Load your audio files using Concatenate to existing tracks as insertion strategy. You’ll get your music on the audio tracks.
-
Adjust the order of the images. Move to Drag-and-Drop editing mode by clicking on the arrow button in the control bar. Then drag and drop the edits around your project.
-
Tewak the lenght of the images by dragging the icon’s right boundary keeping the mouse pointer inside it.

