mencoder -vf harddup -demuxer lavf -oac pcm -ovc lavc -lavcopts vcodec=mjpeg -vf scale=640:360 -noskip -mc 0 -ofps 25 -o proxy.avi original.mts

NOTE: This website is alive and growing.
Proxy editing
Table of Contents

|
BEWARE!!! Work in progress |
Do you have an HD camera and a computer not powerful enough to edit HD footage? Don’t worry. Cinelerra and proxy editing will come to the rescue.
What is proxy editing?
In English a proxy is a person holding authority to act for another.
Proxy editing is an editing workflow that uses temporary smaller proxy files in place of the original HD files that are so big that Cinelerra can’t playback smoothly. Editing is done with proxy files, rendering is done with HD files.
How to set up proxy editing
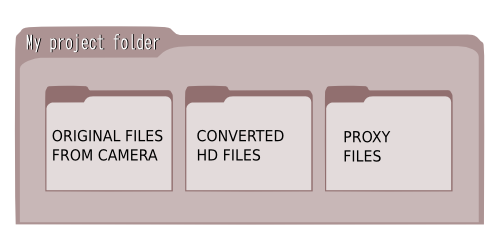
The image above suggest how to organize your files at best. It’s very important you keep to this placement since Cinelerra is very fussy about paths to files.
Original files from camera
Download the files from camera as you usually do. If your camera saves on card or HDD (Hard Disk Drive) just connect the camera to an USB port. It will be recognized as an external mass storage device you can copy files from.
If you have an HDV camera, grab your files with dvgrab.
Keep the original files safe. Store them in a dedicate folder inside your Project folder.
In this folder you will save also the conversion script and convert files to supported HD and proxy.
|
|
Beware: Converted HD files and proxy files might have the same filename and extension. To avoid confusion, store them in a properly named folder. |
Converted HD files
This folder is needed only in the (likely) event Cinelerra can’t read the files from your camera.
Convert your original camera files to MJPEG using the recipes available in the Preparing media page.
Those files won’t be used for editing. They will be used for rendering.
Proxy files
This folder will contain the proxy file to be loaded in your Cinelerra project.
Make sure you save the XML projet file in this folder, along with the proxy files. Don’t use subfolder or your workflow will become much more complicated.
To create proxy file follow the instructions below.
How to edit my project
Edit your project normally in Cinelerra, loading the proxy files in place of the HD original (or intermediate) ones.
Go to Settings→Format and make sure the project is set to the proxy resolution and aspect ratio.
Right click on a video track and select Resize track from the popup menu. Make sure the track size and the project size match.
Save your project in the Proxy folder, along with the proxy files. Don’t use subfolder or your workflow will become much more complicated.
Note that adding images or using the compositor’s camera might bring specific issues.
How to render my project to HD
Move your XML project file from the Proxy Files folder to the Converted HD folder. Open it in Cinelerra.
Go to Settings→Format and make sure the project is set to HD resolution and aspect ratio.
Right click on a video track and select Resize track from the popup menu. Make sure the track size and the HD project size match.
This is all you have to do before rendering if your project is simple.
For projects that uses images, scaling or compositor’s camera, see the HOWTOs below.
How to create proxy files
Make sure you have mencoder installed. It is the MPlayer’s Movie Encoder.
You can create small MJPEG proxy files converting your original files or the intermediate files. Use the following terminal command. As usual, remember to replace proxy.avi with your destination filename and original.mts with the file to be converted. Also make sure your footage has a framerate of 25. If your files have a different framerate (e.g. 30) correct the option -ofps accordingly.
For HD (1920x1080)
For anamorphic HD (1440x1080) or anamorphic 720p (960x720)
mencoder -vf harddup -demuxer lavf -oac pcm -ovc lavc -lavcopts vcodec=mjpeg -vf scale=480:360 -noskip -mc 0 -ofps 25 -o proxy.avi original.mts
|
|
If you recorded at 50fps for slow motion remember to change the -ofps option (Output FPS) to 50. |
|
|
If you see your converted file gest a strange aspect ratio (e.g. squeezed), you might need to make the vcodec option longer to fix it vcodec=mjpeg:aspect=16/9. Adjust the aspect ratio 16/9 to your case. |
If you are happy with the above command and want to convert several files at once, you can use a script. I prepared one for you. It creates a folder called PROXIES, it converts the files to a smaller resolutions and it puts them in the PROXIES folder.
Click one of the links below to download the conversion script correct for your resolution. Save it in the folder of your original files.
For HD (1920x1080)
For anamorphic HD (1440x1080) or anamorphic 720p (960x720)
-
Open a terminal
-
Enter the folder of your files with the following terminal command. Replace MyFolder with the name of your folder.
cd MyFolder
-
Make the script executable with the following command (adjust the script name if you use anamorphic HD):
sudo chmod 755 MTS2PROXY-1920-25fps.sh
-
Convert your files with the following terminal command (adjust the script name if you use anamorphic HD):
./MTS2PROXY-1920-25fps.sh
|
|
If you made any variation to the mencoder command and you want to use the script, you have to adjust the script too. Just open it in a text editor and edit it before use. |
|
|
If your video files are on an external disk you might not be able to change the permissions of the script. This is because FAT32 filesystems (default on USB flash drives) or NTFS filesystems do not support Linux permissions. Don’t be surprised: they are Microsoft filesystems. If this is your case, save the script in your home folder and change the permissions. Then enter the folder with the video and run the script with the full path. In my case the command for running the script would be /home/raffa/MTS2PROXY-1920-25fps.sh |
How to handle images
Coming soon
How to handle the compositor’s camera
Coming soon

