nautilus /usr/lib/cinelerra/shapewipe

NOTE: This website is alive and growing.
Adding transitions
Table of Contents
How do transitions work?
A transition is a gradual change from an edit to another.
It appears on the timeline between two edits and it is represented by:
-
a square icon (symbolizing the type of transition)
-
a brown bar (symbolizing the transition’s length).
The best way to understand how transitions work is to analyze the Dissolve video transition.
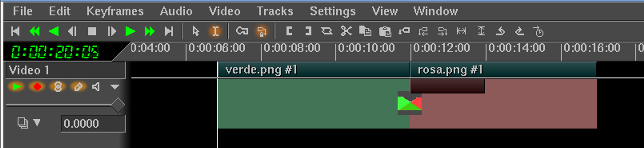
Here you see a 2 seconds long transition between a green edit and a pink edit.
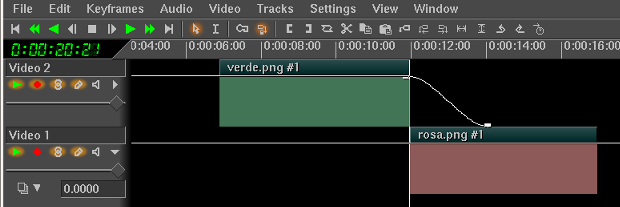
The same, identical video transition can be obtained putting the edits on different tracks and gradually reducing the opacity of the upper one (fading it out).
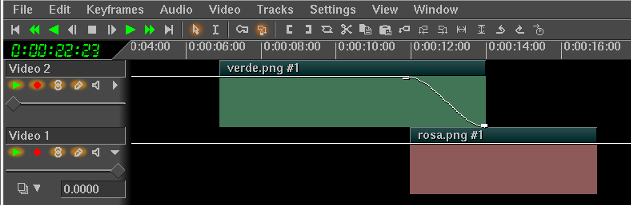
It’s extremely important that you notice that the two video edits overlap for two seconds. It’s pretty obvious when you look at the second screenshot, but it is so (even if not visible) also in a one-track-only transition. In this case two seconds of the green edit are implied in the brown bar and not represented as video picon.
From this fact it comes an important rule for using transitions:
You need more footage than you imagine!
In our example the green edit preceding the one-track-only transition must have two spare seconds after the right edit boundary to "feed" the transition.
What happens if there are no spare frames?
The two edits won’t overlap.
Cinelerra will come to the rescue and will use the last frame of the first edit to "feed" the transition. Clever, isn’t she?
Yes, but…
In case of a transition between two still picture you won’t have any problem. In case of a transition between two video edits your first edit will freeze during the transition, this being particularly noticeable (and ugly) with fast movement videos.
The only solution is to drag backward the right edit boundary of the first edit. Changing the transition length can help it fitting.
How to add a video transition
You can add transitions between video edits.
-
Click on the Video Transition tab of the Resources window to get the list of the available video transitions.
-
Drag the icon of the transition to the timeline. A white square outline will appear between edits, marking the place where the transition is going to be added once dropped.
Video→ Default transition will add the last used transition to the edit boundary preceeding the insertion point (if you are lucky).
The keyboard shortcut for this opearation is Shift-U. There are no keyboard shortcuts for luck.
How to crossfade audio
Crossfade is the only audio transition available. You can find it in the Audio Transition tab of the Resources window.
Drag the Crossfade icon to the timeline. A white square outline will appear between edits, marking the place where the transition is going to be added once dropped.
Audio→ Default transition will add the Crossfade transition to the edit boundary preceeding the insertion point (probably).
The keyboard shortcut for this opearation is u.
How to modify the duration of a transition
You can’t drag the boundaries of a transition.
To modify the duration of a transition right click on the transition icon and select Length from the popup menu.
Adjust the number of seconds and click on the green tick symbol.
Cinelerra will memorize this measure and will keep it for the following transitions (unless you modify it again of course).
How to modify the behaviour of a transition
Most transition have different behaviours available.
Right click on the transition and select Show from the popup menu to open the transition dialog.
How to delete a transition
Right click on the transition and select Detach from the popup menu.
How to add fancy 3D transitions
If you want to add fancy 3D transitions… well… you need proprietary software.
Cinelerra can’t do 3D transitions and I don’t know any Free Software that can (except Blender where you can make your 3D video yoursef).
They say she is meant to serve the professionals that don’t need distracting transitions to hide bad quality footage. Fancy 3D transitions are usually condsidered consumer’s stuff.
Don’t despair, Grandma: the Shapewipe transition can probably be of some consolation.
How to make the Shape Wipe transition work at best
The default Shape Wipe transition will make the change from your first edit to the second one shaped like a heart.
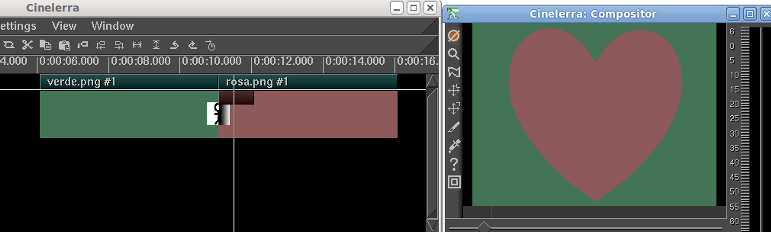
To achieve that Cinelerra uses a gray-scale PNG image as reference.

If you right click on the transition icon on the timeline and select Show from the popup menu you can choose between 5 different shapes, that is between 5 different gray-scale PNG images. Click on Browse to view the list of available shapes.
Note that you are browsing images you have installed in the /usr/lib/cinelerra/shapewipe folder (if you installed a precompiled package) or in the /usr/local/lib/cinelerra/shapewipe folder (if you compiled Cinelerra yourself).
If you browse your filesystem outside Cinelerra you can actually watch those images.
As usual the quickest way to do that is using the command line. Open up a terminal and copy-and-paste one of the following commands:
If you installed a precompiled package:
If you compiled Cinelerra yourself:
nautilus /usr/local/lib/cinelerra/shapewipe
You see? The functioning of the Shape Wipe transition is very simple.
You can even add more gray-scale PNG images to this shapewipe folder [1] so to have more shapes available for use.
Where to get those images?
-
Paolo Rampino (akirad) maintanins a package of image ready for use called cinelerra-swtc. You can install it with Synaptic.
-
Other images are available on the Internet. Have a look at the Cinelerra-cv website for tips.
-
You can also create gray-scale PNG images yourself. Paolo Rampino (akirad) wrote a guide to Make your own video transition with Cinelerra and Inkscape.
Have fun!
[1] Fussy people would say that you can store your gray-scale PNG images in any place of your filesystem since Cinelerra will let you browse anywhere. While this si good in principle, it won’t make your work quicker.
How to add a chosen transition to all the pictures of a slideshow
(the quickest way)
The quickest way of adding the same video transition to all the pictures of your slideshow is to edit directly the EDL in a text editor. It looks scary but in fact it is pretty grandmable.
Let’s try with a Dissolve transition.
I assume you have already loaded all your pictures on the timeline and you have saved your project as myproject.xml.
-
Add only one Dissolve transition after the first edit. It will work as a template.
-
Go to File→Save as… and save your project with a different name (myexperimentalproject.xml), just to keep the original copy safe and sound (you never know, Cin may not like what you have done!).
-
Close Cinelerra.
-
Open your new XML project file with a text editor. Right click on myexperimentalproject.xml and select Open with "Text editor" to open it with gedit.
You are now watching a text file, written in XML language, describing your project. -
Click on the Replace button and enter Dissolve in the Search for fied.
-
Click on Find to highlight that word twice. The first time when the generic parameter of the defaul transition is set. The second time you’ll find it inside the description of the whole edit, describing the transition you have just added in Cinelerra.
It will appear like this:
<EDIT STARTSOURCE="0" CHANNEL="0" LENGTH="111"><FILE SRC="/home/raffa/MammaMia/Pizza01.jpg"></FILE>
<TRANSITION TITLE="Dissolve" LENGTH="25"><ON></ON><KEYFRAME POSITION="0"></KEYFRAME>
<KEYFRAME POSITION="0"></KEYFRAME>
</TRANSITION>
</EDIT>
-
Note that the edit description is comprised between <EDIT and </EDIT> and the transition description is inside it, comprised between <TRANSITION and </TRANSITION>.
-
Confront it with the description of the following edit, the second still picture that has no transitions set. It should appear like this:
<EDIT STARTSOURCE="0" CHANNEL="0" LENGTH="125"><FILE SRC="/home/raffa/MammaMia/Pizza02.jpg"></FILE></EDIT>
The transition description is inserted between </FILE> and </EDIT>.
-
Now Search for:
</EDIT>
and Replace it with:
<TRANSITION TITLE="Dissolve" LENGTH="25"><ON></ON><KEYFRAME POSITION="0"></KEYFRAME>
<KEYFRAME POSITION="0"></KEYFRAME>
</TRANSITION>
</EDIT>
-
Click on Replace to check the result. If you are happy with it, click on Replace All. Close the Replace dialog box and Save your changes.
-
Open myexperimentalproject.xml with Cinelerra and preview your masterpiece.

