
Multicam
Introduction
Multicam stands for multicamera set-up. It is a set-up where many cameras are stationed at different positions to record the same action from different angles. It’s common for recording sport or other events for TV live broadcast. Big events can require as many cameras as 16. Fiction films productions can use multicamera too, but the need to hide the equipment on the set usually limits the number of cameras to 2-3.
Editing multicamera recordings requires a specific workflow. You need a video mixer, that is a console that allow the simultaneous preview of all the videocamera inputs so that the editor can select the best camera angle for every moment.
To know more consult Mighty Wikipedia
How to turn Cinelerra into a video mixer (well… kind of)
Cinelerra has not a video mixer function.
However Lorenzo Sutton had the brilliant idea of turning the compositor window into a kind of mixer using the Projector zoom. You won’t have the easy workflow of a real video mixer but you can edit selecting from simultaneous preview of all cameras.
This workflow is experimental and needs improving. Main issue is performance.
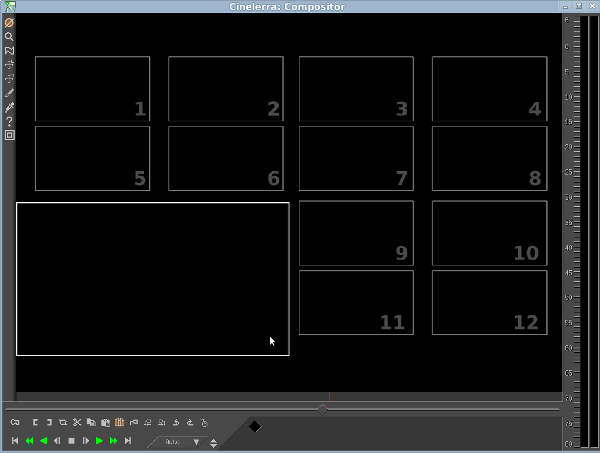
Here you can see my Compositor window ready to accept 12 small camera inputs (one for each of the 12 cameras) and a bigger output for my edited video.
|
|
You might need to use a second screen display. I use my main monitor for the Timeline and a lovely old CRT monitor for the Compositor. |
|
|
I assume you are recording audio with an external audio recorder (DAT) for better audio quality. The audio recorded on your camera is used only as a reference for synchronizing tracks. The use of a clapboard will make the editor much happier. |
|
|
To ease synchronization don’t let the cameras record with continuous RECORD/STOP cycles. Instead make all the cameras stay always on RECORD for all the time of the event even if they are recording rubbish. This way you’ll get a single videofile for every camera/event, easy to store, synch and edit. |
Step 1: setting up the tracks
The idea behind the set up is to double every track and use an instance of it for monitoring (preview) and the other for editing.
The twelve small canvases you can see above, numbered from 1 to 12 are 12 monitoring video tracks, zoomed in (projector Z=0.2100) and positioned well apart in the free space of the compositor.
The bigger canvas you can see in the bottom-left part of the compositor is made of 12 editing video tracks one over the other, mixed as you desire to a single output. All 12 tracks are zoomed in (projector Z=0.500) and positioned all in the same bottom-left part of the compositor.
To ease the job of setting up the tracks I’ve prepared a couple of empty template projects you can download and fill with your files.
Download the multicam template projects with the following loooong terminal command:
wget http://www.g-raffa.eu/Cinelerra/HOWTO/Files/Multicam-8-12-720x576-anamorphic.tar.gz && tar xvf Multicam-8-12-720x576-anamorphic.tar.gz && rm Multicam-8-12-720x576-anamorphic.tar.gz
You’ll get a folder named Multicam-8(12)-720x576-anamorphic containing an empty project set up for 8 cameras and and empty project set up for 12 cameras. This template project is set for an anamorphic PAL signal but can be easily adapted to other resolutions and aspect ratios.
Step 2: loading the files
-
Arm only two tracks: Video 1 - edit and Audio 1
-
Set the insertion point at about 10 seconds on the timeline (so to have spare silence to ease the synchronization)
-
Load the file from camera 1 using Paste at insertion point as insertion strategy.
|
|
To keep the timeline shorter, I prefer to use only one audio channel, even if I have a stereo audio reference. When you load a clip with stereo sound on a single audio track you’ll get the two audio streams in the same track, one after the other. Simply delete the second stream and use only one channel for reference. |
-
Adapt the legth of the template background .png image in the upper track to the length of your project.
-
Duplicate the clip at video 1 - edit to Video 1 - monitor as follows:
-
Double click on the clip to select it
-
Arm only the Video 1 - edit track
-
Press the c key or copy it using the buttons or the menu
-
Arm only the Video 1 - monitor track, making sure the selection is still active
-
Press the v key or paste it using the buttons or the menu
-
|
|
This operation is very long when described with words but it is immediate when described with keyboard short cuts:
|
-
Arm only two tracks: Video 2 - edit and Audio 2
-
Load the file from camera 2 using Paste at insertion point as insertion strategy.
-
Synch the two clips using the audio as a reference. You might ned to zoom the timeline to frame level.
-
Duplicate the clip at video 2 - edit to Video 2 - monitor
Repeat the procedure untill you’ve loaded all the files from the cameras.
Step 3: editing
For soft transitions use the Fade line. For straight cuts use the Mute line. To make the Mute line visible go to View→Mute. This will make a blue line visible on each track.
Make all the edit tracks black. Make visible only the portion of tracks you choose by selecting one of the monitored tracks.
Note that the playback of 24 zoomed tracks may need a lot of computing power, even with standard definition assets, surely more than my average computer can afford. You might end up with unacceptalby low framerate (e.g. 2fps). To speed up playback for general preview disable the playback of monitor tracks. For editing, scroll playback on the timeline moving the mouse cursor over the timebar.
Step 4: rendering
Once you are done with editing, disable playback of monitor track (to save computing power).
-
Single arm the first editing track (SHIFT+TAB when mouse cursor is over track).
-
Right click on the Compisitor window and select Resect projector.
-
Repeat for each track
-
Check your work by playing back your edited tracks at full resolution.
-
Render a usual

